By Mark Levisay
During the Corner Store’s May gardening workshop, we dug deep into the subject of growing tomatoes. There’s nothing like a fresh tomato from the garden, but they are not the easiest crop to grow. I’ve been growing tomatoes for a long time in Central Virginia and have learned a few things. Let’s dig in.
Determinate versus indeterminate tomatoes
Choosing the best variety of tomato for your situation is one of the first things you can do to get off to a good start. Tomatoes are divided into two general categories: determinate and indeterminate. These terms refer to the growth habit of the plant over its lifespan, with determinate tomatoes only reaching a certain height before ending their upward growth. This type might be for you if you’re growing in pots, have a small space for the plants or want most of your tomatoes to ripen at the same time. Indeterminate plants will continue to grow until killed by disease or frost and probably will give you a larger harvest of fruit over their longer lifespans.
Heirloom versus hybrid
The number one problem most people encounter in growing tomatoes is disease. Heirloom tomatoes, those “old fashioned” varieties famed for their great flavor, with seeds saved and passed down through generations often have very little genetic disease resistance. Hybrid tomatoes, on the other hand, have been specifically bred to have resistance to various fungal and bacterial diseases commonly seen on tomatoes.
The list of tomato diseases is long, and I’ll just list a few as an example. V stands for Verticillium Wilt, F for Fusarium Wilt (of which there may be a type 1 and/or 2), TMV for Tobacco Mosaic Virus, S for Septoria Leaf Spot and N for harmful nematodes. Many seed catalogs will have a more complete list, and they should have a string of letters included in the description of the hybrid tomato varieties describing their resistance. If you don’t know what specific disease(s) you’re dealing with then more letters after the variety’s name is what you should look for. If you really want to find out the disease specifics, you can take a diseased branch from your tomato plant to your extension agent, and they will help you identify the problem-often by sending the sample to your State University. This will take a little while, so it may not help in dealing with the disease currently but may help inform your choice of variety next year.
Cultural practices to promote growth and reduce disease
Now that you’ve chosen your plants, we can discuss the best way to plant and care for them. I recommend planting in raised beds which promote drainage and give you room to amend the soil with organic material like compost. Allowing the soil surface to dry out between waterings is key, as many tomato diseases are fungal and grow well in damp conditions. The raised bed also makes it easier to plant your seedlings deep-6” or more is common practice. Unlike most plants, tomatoes will create roots along whatever part of the stem is in contact with the soil-the “hairs” you see on the stem are actually incipient roots that will grow once covered in soil. Be careful not to bury any branches as they will rot. Snap off several branches and any “suckers” (we’ll talk more about them later) on the bottom of the plant and make sure the bottom most branch is an inch or two above the soil line.
Spacing is a very important consideration, as airflow around the plants and sunlight shining on the plants will help reduce diseases and their spread. Avoid planting the individual plants so close that their leaves touch, as this can aid in disease transmission. Individual plants spaced 2 ½’ to 3’ apart in rows at least 3’ apart is a good start-the more space the better. I usually measure out the spaces in my bed and “plant” my supports (I use 8’ 2x2” wooden poles) first, then I run my soaker hose around the base of the poles before planting the seedlings. Mulching the tomato bed after planting is also important, as fungal spores can survive in soil for as long as 5 years and soil splash after a hard rain can infect the newly planted seedlings. Compost, shredded bark mulch, straw or even newspaper can be used-the important thing is to isolate the leaves of the plant from the soil after planting.
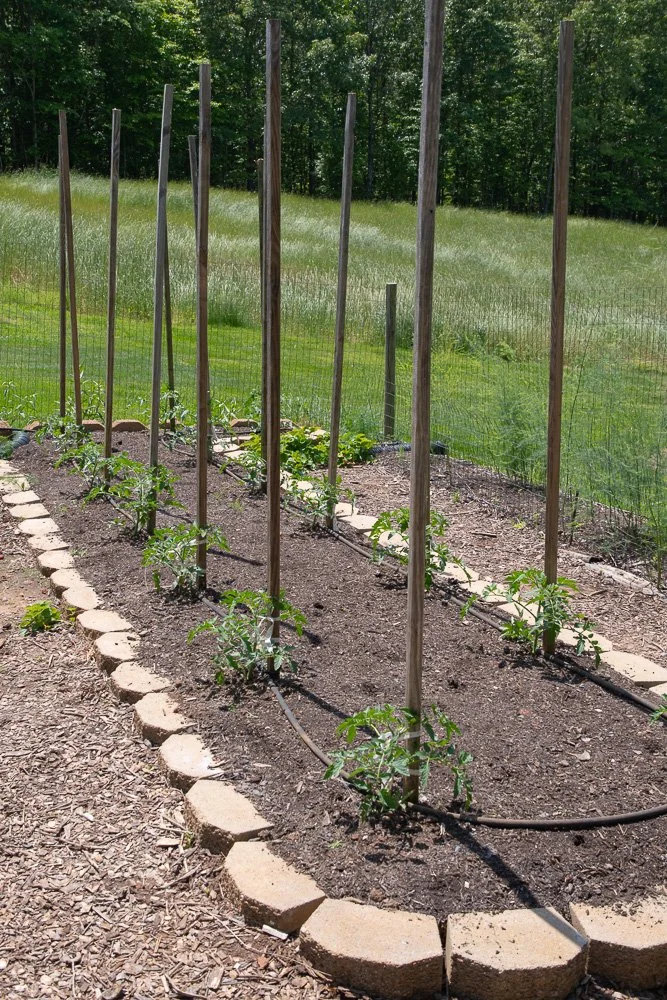
This 20’ long bed holds two rows of tomatoes spaced 3’ apart. Note the wooden supports and soaker hose.
Staking or caging is critical if you’ve chosen to grow indeterminate tomatoes. Tomatoes really want to grow UP and the supports encourage this. You also want the plants to stay off the soil as it may contain disease spores or harmful bacteria. I prefer tall wooden poles but many people prefer tall metal cages. Make sure you can reach into the cage to work with the plant, as over time you’ll need to prune the plant and remove diseased leaves and branches. I cut old sheets or pillowcases into ½” to ¾” strips about 12” long and tie the tomato plant loosely to the support with these. This process encourages upward growth and makes the plants more resistant to summer storm damage. (It also makes the tomatoes easier to harvest later on!) I tie them up after about 6” of growth, or before storms are predicted. I usually add a wood screw halfway u my support post on the back side. This helps the ties have something to catch on to when the plant gets heavy.
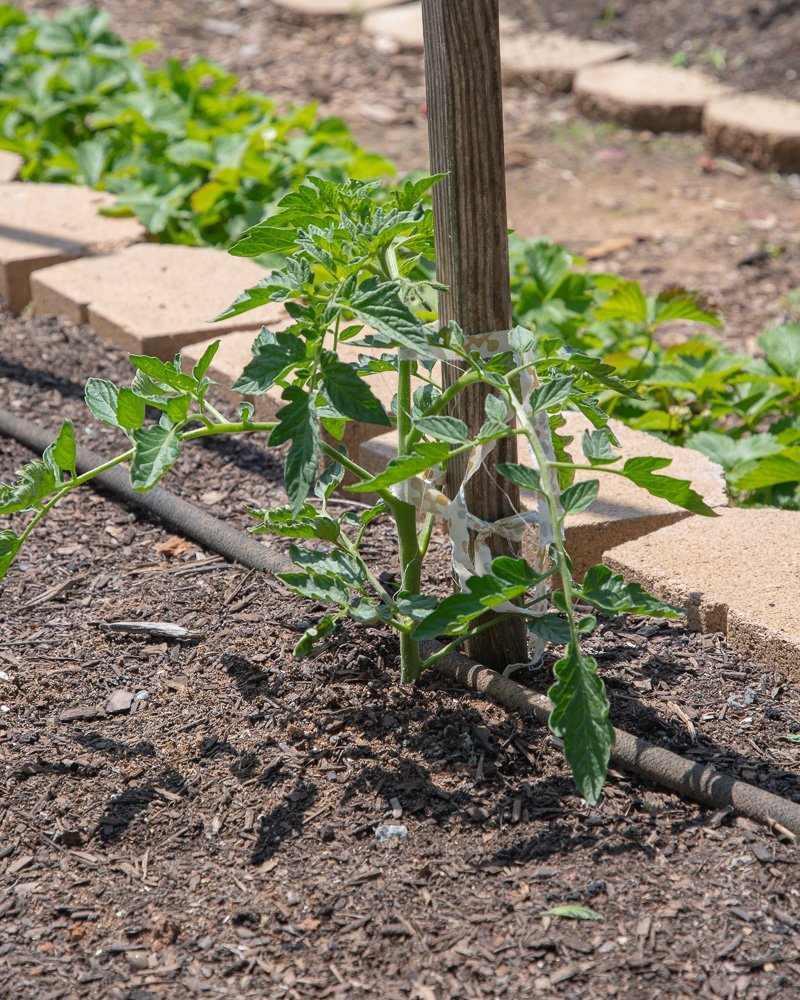
This plant has been tied up twice and had its suckers removed.
“Suckers” and pruning
When I tie them up I also remove the “suckers”. Suckers are the new shoots that grow at each “node” or the point where the branch leaves the stem. These will eventually produce fruit, but the plant will be too thick for good airflow or sunlight penetration, and the root system can only support so many stems. I remove almost all of the suckers that appear over the summer, training the plants to have two, or three stems at the most.

This photo shows a node about 12” above the ground with an especially robust sucker. (The main stem is to the left). This sucker can be allowed to grow and become a second main stem on the plant.
Another form of pruning that MUST be done is the removal and disposal of any diseased portions of the plant. Consider any brown or spotted leaf as contagious and remove it as soon as you see it. Visiting your tomato patch daily to inspect the plants is a good habit to get into. Take some kind of container and remove any diseased plant material you see. Throw it away or compost it in a place far from your tomato patch and never use that compost in your garden unless your compost pile achieves very high temperatures that can kill the disease pathogens.
Daily inspection also allows you to watch for any insect pests such as hornworms, which can be hand picked off the plants. As a side note, watch for hornworms that appear to have grains of rice stuck to their bodies. These are actually the eggs of a predatory wasp, and these infected hornworms should be left on the plant to allow the wasps to hatch.
Watering techniques to reduce disease transmission
Proper watering is important not only for plant growth but disease reduction. The main goal here is to supply the plant with the water it needs for growth but avoid wetting the leaves in the process. I use soaker hoses as they allow me to water all of my tomato plants at the same time with the same volume of water and put that water directly into the ground.

Closer look at the base of the plant and the support pole and soaker hose. The hose should be close to but not touching the base of the plant.
An alternative would be to use a watering wand to directly apply water to the base of the plant. Newly transplanted seedlings may need some water every day (if it doesn’t rain) until their roots are established. After that several good soaking each week should be sufficient. A general rule of thumb is that plants will need about 1” of water per week for growth. Keeping a rain gauge near your garden can help you determine how much water mother nature has provided and how much you may need to add. Proper watering can also help to control blossom end rot, which is actually a calcium deficiency rather than a disease. If you see this grayish circular area on the bottom of your tomatoes it indicates you are not watering enough, or deeply enough and is usually easy to correct.
Fertilizing guidelines
Fertilizing tomato plants is important, as you are expecting these plants to grow a lot and produce multiple pounds of fruit. I usually add 1 to 1 ½ cups of general purpose fertilizer (I use Espoma Plant-Tone 5-3-3) when I plant my seedlings. This gives the plants a good charge of Nitrogen for their initial growth. When the plants have set a good batch of green fruit, side dress with a cup or so of a fertilizer higher in Phosphorus and Potassium which will help promote fruit production and ripening. (I use Espoma’s Tomato-Tone 3-4-6) Do this at monthly intervals until the end of the growing season.
Time for harvest
Just a brief note about harvesting tomatoes, as most everyone can recognize a ripe tomato ready to come into the kitchen and be eaten! If you have trouble with birds or squirrels eating your ripe fruit, try picking the fruit before they fully ripen. Set them on a kitchen counter on a layer of newspaper or in a shallow cardboard box and they will ripen pretty quickly at room temperature. This also works at the end of the season if disease is destroying your plants or frost is near. (make sure to select only spot free green tomatoes.) Another trick I’ve learned is that freezing is a way to deal with a large harvest of ripe tomatoes if you’re planning on making salsa or spaghetti sauce. Wash, core and quarter the ripe fruit and freeze in gallon size freezer bags. When you’re ready to make sauce, thaw them(I use the microwave on low). A lot of the water present in the fruit will separate and can be poured off before cooking. The skins will also separate from the fruit and can be easily removed.
Critical end of season chores
End of season clean-up is a really important part of raising tomatoes. When disease or frost has ended your growing season remove ALL of the plant material from the garden and dispose of it. If you’ve had any fungal or bacterial disease present on the plants then you should consider all of that material to be potentially contagious. Many fungal spores can survive for up to 5 years in the soil, so you want to minimize the amount of material that’s left behind. If you compost the refuse, please don’t use that compost in your vegetable garden in the future unless you are absolutely certain the compost heap has achieved a temperature high enough to kill the pathogens. Fall is also a good time to think about crop rotation for next year’s tomatoes. It is important to not plant tomatoes in the same place every year, due to the possible presence of disease pathogens in the soil. Planting another crop not related to tomatoes (such as potatoes or peppers) is a great idea. Plants like garlic, onions, cucumbers, squash or melons are a good idea. Legumes like beans and peas are especially good as they will add nitrogen to the soil as they grow. A four or five year rotation schedule is good since some spores may be active for up to 5 years.
Good luck and let me know how things go with your tomatoes! Joe Gardener (Joe Lamp’l) has a website full of information about all aspects of gardening, including tomatoes. Virginia’s Cooperative Extension www.ext.vt.edu also has a wealth of information about gardening practices and tomatoes. If you have questions contact me at marklevisay@gmail.com.
Join us next month for our workshop on June 17, Pollinators, Yes. Deer, No. We’ll talk about how to attract more bees, butterflies, and other pollinators to your garden without having your plants mowed down by deer. No matter what kind of garden you have—shade, sun, or container—we’ll offer practical advice to keep blooms going from early spring to late fall and support the entire lifecycle for a variety of pollinators. We’ll also provide plant recommendations and deterrent techniques that will keep deer from destroying your efforts. 1 hour, with plenty of time for Q&A.